 |
| This blog post is dedicated to Phil Borge who dared me to plunge into a Kenyan kitchen and emerge, recipe aloft, to tell the tale and share the joy. |
The humble and glorious chapati. A mainstay of East African culture and an essential part of any Kenyan feast. This blog post is written in praise and glory of the chapati, and shows you how to make them Kenya-style.
For those of you wondering why an Indian food came to be so important in East Africa, look no further than the British. Kenya’s colonial masters chose to build a railway connecting the East African interior (Uganda) with the Kenyan port of Mombasa for trade, access and…. well just because we could, really.
Dubbed ‘The Lunatic Line’ by Victorian commentator Henry Labouchere, it once spanned the region like a clanking iron snake, and still exists as ‘one of the world’s best train journeys’ even if the now much reduced network is in desperate disrepair. At time of writing the line is closed for maintenance work, although we were lucky enough to travel the Nairobi-Mombasa overnight journey three times last year (and escape with our lives). We found it to be an oddly charming colonial relic, complete with bunks, a dining car and frightening toilets.
Between 1896 and 1901, 38,000 Indian labourers were shipped over to Kenya to build the railway. It seems that local Kenyan workers were...'reluctant' to provide slave labour for this nutty British project. Instead, the railway was built by the Queen’s subjects from India. 6,000 of these railway workers who had survived the conditions, the diseases and Tsavo's man-eating lions stayed on and made a permanent home here. Kenya's Asian population contributes massively to Kenya's culture and (particularly) the economy to the present day. One of those contributions is our humble and delicious chapati.
Preferring their chapati’s heavy, thick and made with a lot of oil (and who wouldn’t?) Kenyans soon moved away from the thinner, healthier, Indian chapati and created their own. Always made for special occasions, ‘chapati’ or ‘chappo’ is the answer when asking most Kenyans about their favourite food. Many Kenyan friends and colleagues have happy memories working together in the kitchen with mother and siblings to make the dish. Dan and I eat many every week as they are just so tasty in a country where many of the staple foods don’t rock our boats.
Sold on street stalls all over Kenya, the Professional Chapati Makers (do they have a name?) have two (or more) pans on the go at once; they are hunched over, spinning one with each hand like a DJ at a turntable, and rolling out more dough with every spare second. This is all very impressive, because making one at a time was tricky enough…
Dan and I spent a recent evening in the lovely home of pals Kristen and Jack. We were there for our chapati lesson with Jack, and super fun it was too. We learned why personal trainer Jack often starts conversations about weight loss with clients by determining their ‘chapati intake’, by discovering exactly how much oil goes into Kenyan chapati. This, people, is why they taste so good. Big thanks to Kristen and Jack for such a fun time, and special thanks to Chef Sukura for his patient guidance, and sharing his mother's precious recipe with us all. You guys rock.
 |
| Dinner at Kristen and Jack's = good times. |
Roll up your sleeves, and let’s get started. We’re making chapati for four people.
Ingredients
500g plain flour
2 cups of warm water
A little salt2 cups of warm water
A little sugar
A lot of vegetable cooking oil
Method
1. Put all the flour in a big bowl. Mix ½ teaspoon of salt and 3 teaspoons of sugar in a cup of warm water, and add to the flour. Add 50g vegetable oil, plus another cup of warm water with nothing added. Mix it all up with your hands so the dough takes in all the flour. Be careful not to make it too sticky (add flour) or too flaky (add water).
 |
| Dan gets stuck in |
 |
| LOTS of oil |
 |
| Give it a mix |
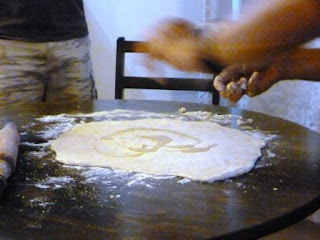
2. Roll the dough out flat with a rolling pin or wine bottle, but not too thin. Use more flour to stop everything sticking together. Pour another tablespoon of oil over this chunky pancake and smooth it all over the top.
 |
| Roll it out |
 |
| More oil |
 |
| Cutting into strips |
 |
| Tight little rolls |
 |
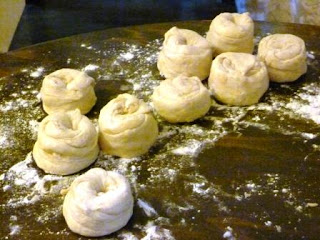
| Nine chapatis, ready to be born |
 |
| Jack shows us the chapati pan |
 |
| Spinning the chapati |
7. Flip it with the tablespoon and your hand and completely coat the just-fried side with (more!) oil using your spoon. Flip after a short time to do the same with the second just-fried side. The chapati will bubble up and brown in patches so keep smoothing it down with the back of the spoon.
 |
| Smoothing on the oil |
8. When there are dark brown patches on both sides and you’ve flipped it 3 or 4 times your chapati is cooked. Each one should take less than 3 minutes to fry in the pan.
9. To conserve your fuel, and have more fun, ask a friend roll out the next dough ball while you’re cooking and switch duties once yours is cooked.
 |
| Keep cooked chapatis covered until you’re ready to eat |
11. Cut into friendly quarters and arrange on a dish. Serve with your favourite meat stew, vegetable dish or fish if you're feeling coastal.
 |
| Ta-daaa! All ready |
We had our chapattis with Kenyan favourite Ndengu, which are green grams (like lentils) cooked with grated carrot, peppers, skinned tomatoes and coriander. Thanks Kristen. You can even add coriander and grated carrot to the dough to make seriously tasty chapattis. We’ll try that next time.
 |
| Kristen's homemade ndengu. The perfect partner for our chapatis. |

...your recipe helped me alot at 3am when i had insomnia!haha,thanks
ReplyDeletenice! they turned out perfect and look delicious
ReplyDelete